How to paint colourful reflections in watercolour
Share
I have a brand new full step by step demo on YouTube where I show how I paint boats, palm trees, and those lively tropical reflections. If reflections in water or boat shapes feel tricky, this lesson will really help. Watch here: https://youtu.be/9nUBz6PxPNc
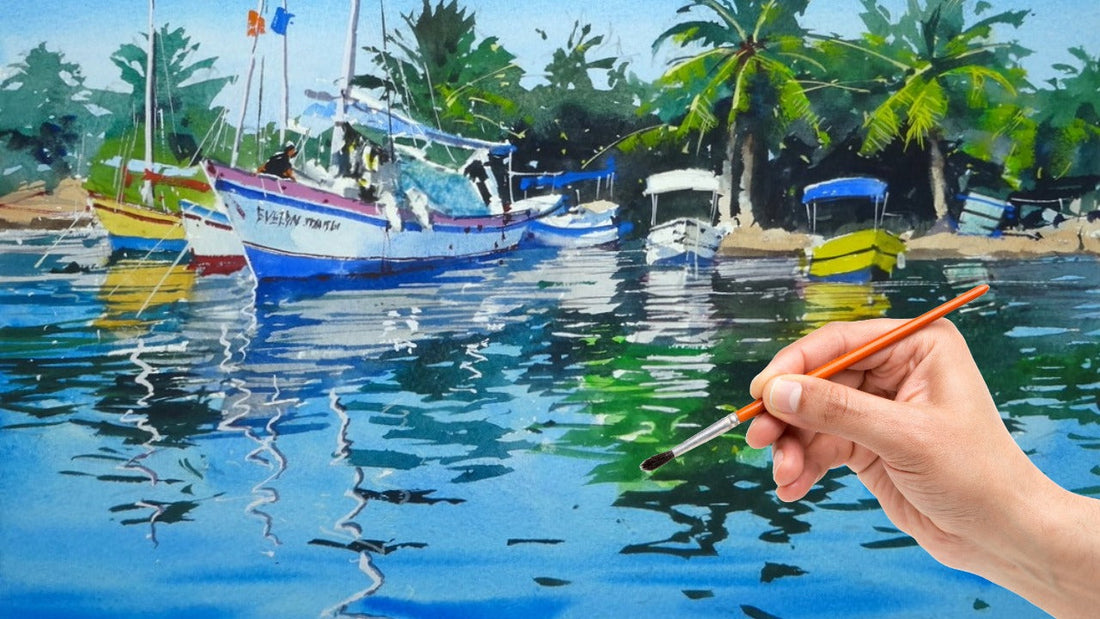
What we paint
A bright Caribbean scene with palms, a main fishing boat, a couple of smaller boats, and calm water with ripples and reflections. I explain the plan first, then paint live in real time, so it is easy to follow along. This is an edited recording from a live Patreon demo. Nice and relaxed, no rush. Just painting together.
What you will learn
Composition made simple. Where to place the horizon, how to balance the boats left and right, and how to get space for the reflections without crowding the scene. I also talk about removing or moving smaller boats to reduce clutter.
Palm trees two ways. I show negative painting for the light fronds against a darker background, and a second option using thicker body paint for those bright yellow green lower fronds with a dry brush. Clear, easy steps.
Boat shapes and trim. We simplify complex rigging, fenders, canopies and rails. I demo light boat sides, then add the colourful trims like pink, blue and red lines. Keep it loose, but get the angles right.
Reflections that read well. We block in the lighter reflection colours first, then add darker horizontal strokes to suggest movement on the water. I show how reflections are a touch darker than the object above, and how to place the mast reflections with gentle wiggles.
My materials
Paper: Saunders Waterford 300 gsm cold press. Tough, reliable, and great for wet in wet timing. I recommend it a lot in my videos.
Brushes: a Tintoretto style mop for big shapes, plus small synthetics and a rigger for lines and rigging. I like a small flat for the palm fronds.
Palette: neutral tint, burnt umber, burnt sienna, yellow ochre, viridian, spring green, cobalt green, cerulean blue, cobalt blue, ultramarine, lavender, alizarin crimson, cadmium red, light red, cadmium yellow, and white for highlights. I also sometimes use quinacridone gold.
Step by step plan
Sky first. A soft wash, a bit darker at the top, lighter to the horizon. Let it dry.
Background trees. Mid green at the tops with gaps for sky sparkle, then darker at the base to push the beach light forward. After it dries, drop in the lighter yellow green fronds with a dry brush.
Boats. Block in light sides, then add colour accents and shadows. Leave room for canopies and trims. Keep edges clean near the waterline.
Water base wash. From the boat line down, place the reflection colours a touch darker than the boats, then ease into the blue of the sky reflection lower down.
Darker ripples. A few thin horizontal strokes to suggest movement. Less is more.
Final details. Masts, rigging, fenders, tiny people, and a few sharper darks to bring the centre of interest to life. Then stop. Know when to leave it.
Why this lesson helps
It teaches a clear order of work, so nothing feels random. Each layer supports the next. Great for building confidence with boats and reflections.
It is easy to paint along. I talk through each decision and show fixes when things go a bit off. Very friendly and calm.
It is a colourful subject. Perfect if the usual greys and browns feel flat. We use bright warms and cools to get a sunny mood.
Paint with me
Watch the full tutorial on YouTube: https://youtu.be/9nUBz6PxPNc Pause any time and rewatch parts as needed. A cuppa helps.
Join our community
Want feedback and monthly projects with critiques from me. Join my Patreon Painting Club. Friendly group, regular Q and A, and lots of extra posts. From a few dollars a month.
Workshops and demos
Save a seat on my next live online workshop, or catch a replay if the time does not suit. We paint together, step by step, and you can ask questions.
Final tip
Keep it simple. Big shapes first, then smaller accents, then a few crisp darks at the end. That is how you get fresh, clean watercolour with life and sparkle.